2016 Show & Sale will be the Saturday 14th May 2016 held at the Peachland Community Centre in Peachland BC. contact person Barb Janes-Yeo at 250-757-2842 barbandpaulyeo@shaw.ca
The biggest hassle with today's technology is keeping track of one's passwords. Everywhere you go, you need one. I don't have as many keys on my keychain as I do passwords, and there are more doors locked with my cleverness than ones unlocked at the moment. My fault, I fall for that intoxicating lure of "you can get all the good stuff from our site if you only join, make a password and you are in!", which I do, and promptly forget I was interested in the site in the first place and never go again, unless of course I go surfing again and come across it by accident, vaguely remembering I joined and then I desperately plug in my database of secret words until it locks me out. Seems a little juvenile, does it not? Really, I feel like I am back in the heady days of being a kid trying to get into some other kids uber cool "fort" (read ramshackle structure we are lucky didn't fall in on itself and kill us all), and the only thing that kept you from Narnia was a darn arbitrary password that was held by that grubby little tosser who wasn't going to let you in anyway. Nowadays, to make a password, they get all tricksy on you too- gone are the days when you could plug in 1234 - apparently the super criminals are on to that one. Now, they want 8 characters (but less than 16), mix of capitals and lower case, plus a number and/or a symbol, it can't be one that you have used in the last 6 months and can't be the same one as you use for a companion site, and you have to get special authority from the Vatican to use it. Oh it sounds clever, it sounds like it will keep people out and you will be safe from all the evils of the world, but it usually only keeps one person out, namely you, because durn if you didn't forget that you were using the "at" symbol for an "A", or you weren't supposed to use a space just there, and you get locked out and have to call special access number to unlock your account. Ah, the price of technology (which usually is sanity plus a goodly chunk of patience).
Anyway, obviously, I have figured out my password to get back into THIS site. Or at least figured out how to change it. Probably should write it down somewhere....nah.
Anyway, to keep you amused, a few pictures from the last show and sale in 2015. Please check out the information for next year's event!
This first mini is a design by Ruell, who is a South Okanagan Miniature Enthusiast. She did this homage to Johnny Depp, which is fabulous. I like my angle on the picture too...got it so it looks like Johnny is shopping at our show (although he looks like he is late for something). I like to think he would would like my camera angle as well.
The big thing in the last couple of years has been the fairy/gnome garden. the plant shops will sell you the real deal for plants, but if you have a rather black thumb like mine, you needn't go to the extreme of trying to keep anything alive, there are options.
Another little fairy home, should we knock? Why not?
The Okanagan is rather famous for its tiny little hideaways where you can enjoy some of the world's best wines.
An elegant little pumpkin carriage, off to the ball. Is that Cinderella I see in the window?
When you are a small minded soul, you tend to look at everything like it is a place to set a scene. This is quite clever, and I love the colours that were used and the lighting made it very romantic. I could totally vacation there, although I might request curtains.
Miniatures too take the ordinary, and by reducing it, make it unique. I love the little wrap around porch and garden out front.
Another interesting little structure turned miniature.
I seem to recall bugging the lady who made this to make this into a kit. Make the kit, Sherrill. Seriously. Or just one for me. How gorgeous is this?
Not from the show, bu something I collected. I couldn't resist this two headed witch. The afghan behind her has since been whisked away to Australia.
Finally, my garden. Yup. One sunflower. You are asking yourself, how does she do it? How does her garden grow? Against all odds, I say ....against ALL odds.
That is all I have energy for tonight ladies and gents - until the next time I find my password!
Yup, that is a large full frontal blizzard. At the end of February no less. Three short weeks out of spring. It was a little dismal. Personally, I only like blizzards that look like this...
Too bad what we got was the snow and ice cliche kind, and me managing to lose my good gloves this week. Its enough to drive a girl back into bed.
However, when I turned on the TV - I got this!
Nice work boys! Hey, not even ashamed to say I had a bit of a tear in my eye as the lads lined up, held each other in a line hug, and sang the national anthem as our flag went up. Canadians don't get all that patriotic, but when you are talking hockey, even the most hardened heart will melt - sniff! (wipes away a tear).
So.....its been awhile. Decided since I wasn't going to venture out into the ice, snow, and -10 windchill (and if anyone tells you that windchill isn't an issue, tell them that is only true for inanimate objects, in weather like that a warm blooded creature can freeze their toches off ). Anyway, its the perfect time to update this bloggy thing. What have I been up to, you say? Lets take a looksee what we have on the film, shall we?
On a day sunnier than this, obviously, I was gifted with a container. It will probably be a glitter village container at some point, when I make more houses and such. It started life off as a bath and perfume gift pack apparently. It smells vaguely like a box of old cards to me, but eventually it should air out. It is unfortunately a little small for my Mondorf Christmas Market, so I will find a different street scene to do. With glitter. Did I mention, I like glitter?
Speaking of Mondorf, I have finished most of the structures. Above are the baffles of the Church. After fiddling with one side, I realized I was going about cutting these out the hard way - i.e. I was cutting each piece and gluing each piece, meaning I was doing some interesting finger gymnastics and making a general mess. The next batch I cut so everything lined up back to back, and glued the whole chunk as one. Then I only had to cut 4 pieces out instead of 8, and only had to glue once instead of 4 times.
The wee baffles glued down. It looks like it is hovering, but that is some folds under the church propping it up a bit. They are level.
The big Christmas tree for the square. Really quite elegant in the design - basically 4 cones built, with a rectangle folded into a tube for the trunk.
The top of the tree.
A middle section and a trunk made.
Stacking the tree parts....
A view of the under-structure....
The finished tree with the star at the top (Take that, Joyce Kilmer!). Again, you may look at this and say "weird scale", but it is again a more naive interpretation as opposed to a strictly accurate rendition (which is a really good retort to anyone getting fluffy at you because you have goofed up on scale, by the way - you are welcome).
I have been repainting my mushroom house again - you may or may not recall, I bought this at a seconds sale for I think a quarter, possibly 50 cents, I can't remember. I redid the paint job, mainly because what I did before didn't thrill me - for reminders, this is what I had done:
I liked the more "realistic" look I saw on a little mushroom house at a card store. Fairy gardens are hitting the market place in a big way, by the way. I bought three gnomes from the card store (in a section which they dubbed "the garden centre") where I found my inspiration mushroom (okay, that sounded better in my head). They had a number of little fairy and gnome things, which I resisted with a strength of will not seen since biblical times. The smaller gnome, which to me is more of a traditional gnome with the pointy red hat, I found at Michaels, and he is probably going to be in the mushroom, or at least around it. Anyway, if you like gnome and fairy cottages, this is the time to go scoop them up, before the trends change again.
The next thought was, what can I do for the inside? The whole mushroom house is a cool concept, but there are some logistics involved in decorating a structure with a strangely formed inside - i.e. you don't get with nice straight walls - plus a mouth opening that doesn't quite let you do much. I tried a number of different things, eventually settling on a clay treatment for the floor and walls. I used my das clay. Oh das, is there anything you *can't* do?
I cut wood patterning into my walls with a knitting needle. Once everything is dry, I can sand the floor, and decorate from there.
Not bad looking and definitely will be easier to build in now. Air drying clay also solved a small issue I had with the chimney too - unfortunately mushroom roofs are notorious for being rounded and don't lend themselves well to a square bottom chimney, which of course is important to any fantasy narrative, a mushroom house HAS to have a chimney, or it just reads wrong (totally ignoring my mycology class way back when which taught me that fungus cells don't have walls, which is why they are soft, and of course you can't really get much strength out of mush and heat will definitely deflate a mushroom, plus the mushroom I made is notoriously poisonous in a kind of a terminal neurotoxic kind of way, but oh well). The benefit again of air drying clay is you can mold it right to the structure. It is important though to put down glue before hand, or you will have problems later on.
I stopped there for the day, as I have to let this stuff dry before I proceed, and the hockey game is going to be on again soon. I am betting the Canadian boys will win again, what do you think?
On a last note, I did a few more buildings in paper. I find I quite enjoy these little paper houses. My camera doesn't want to load the pictures though, which is probably because I haven't fed it enough batteries today. These are an example of what I made -
Which you can find the patterns for on about.com . The ones they have actually print up a little bit too big, so I actually reduced them, which you can do right from your printer. I am waiting for a less haunted version to come out but these are still quite cute, in a spooky kind of way.
Speaking of about.com, you can also find a pattern tutorial from Lesley Shepherd there as well of little gnomes to make. Proper teeny gnomes too!
I found this fellow on Youtube. He shows you how to make a bit bigger gnome. The time lapse is a little funny, it reminds me of those "how to draw" cartoons, which started off with a stick man and ended up with the Mona Lisa or some other piece of art in 3 easy steps, but it is an interesting approach, and could be easily translated smaller.
Hope you all have a wonderfully "warm inside with a big hot chocolate, warm blanky, and smokin' hot hockey game" kind of day! Ciao for now!
Faeries, come take me out of this dull world,
For I would ride with you upon the wind,
Run on the top of the disheveled tide,
And dance upon the mountains like a flame.
~William Butler Yeats, "The Land of Heart's Desire," 1894
Recently here has been a real upsurge in interest in fairies again, as there seems to be from time to time - whether this is linked to any worldly climate at the moment is unclear, but I am always happy to welcome whimsy where I find it. As a bonus, I have found a treasure trove as of late of stores chock full of sweet little terrariums, usually stone with a small depression in the middle, plus tiny little plants, fairies, gnomes, furniture and accessories, all ready to build a small and idyllic fairy garden. What this means to the miniaturist at the moment is suddenly there are walls of miniatures ready to be purchased! Keep an eye out on your local garden store, craft store, etc., because the trend probably won't last long, but while it lasts one can up their stash, at least for fairy-related goodies. Lately I have had my eye on a fairy garden kit - perhaps the next time I have a really good coupon i will build my rather shy friends a small grotto to call their own. Of course, buying a fairy garden is like buying the horse - the horse is the cheap part. It is the upkeep that gets you, wear and tear on glitter, toadstool damage, etc. It can be a trial sometimes.
Anyway .... Fairies are interesting. They come in all shapes and sizes, are sometimes malicious, sometimes helpful, and other times not a welcome sight due to what the particular fairy represents. If you find a fairy ring, you have found a marker to the village below. Don't go digging, because they tend to have tempers, whether they are benign or not. If you don't particularly want a fairy to visit you, keep a sock under your bed. They don't say why this works - although there are those with such smelly feet the odor retained in their footwear could peel paint off a barn, so maybe that is it (although that would keep me away too, come to think of it).
I tend to like fairies because they fall into the realm of "stuff I like" - unicorns, wizards, magic, dragons, etc. I tend to have the more sweet romanticized dancing/singing/happy version rather than the kidnapping nasty little brutes that are the dark side of Fae.Of course, it seems that any time you have a nice image of something in your mind, some twit will wander over and tell you "the real story" and how your image of the mystical world is wrong. Maybe I will keep dirty socks around just to throw at *them*? Sounds good to me.
At any rate, today I made yet another captured fairy in a bottle (I know, kind of a dichotomy, I like them, but then I capture them. You would have to bring that up. Just for that....
There, that'll learn ya.
As you may or may not recall, I have made a fairy bottle before, albeit a smaller one. I felt the need to make a slightly bigger one this time, so I could add a little more detail. I came across a rather nice "genie" bottle at the dollar store (or perhaps the dollar and a quarter store, as that was the actual price).
I guess it is technically a salad dressing bottle, or perhaps a wine decanter? It came with a lid and the price was right, whatever it was. Anyway, inspiration soon followed.
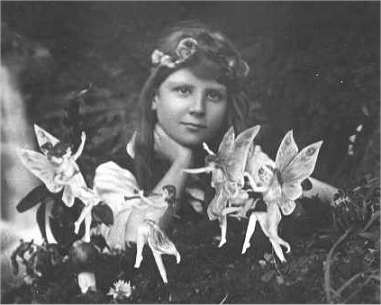
This time, instead of using a 3D fairy, I used a cut out. I have seen this done with the numerous "fairy in a bottle" tutorials, and thought it was a rather pretty way to go about it. I used an actual fairy illustration, but I have seen some very effective "vintage" photos used as well (wings were added to those, although apparently wings are a relatively recent addition to the idea of Fae, where they once moved about simply with magic).
To decorate the outside of the bottle this time, I bought some "modge-able" papers, and modgepodged" my little heart out. I did a double layer - the first layer had the printed side facing inwards, so it gives a little interest to the background of the bottle. The second, strangely enough, had the printing facing outwards. You don't have to use special papers, of course - any thin paper where the ink won't run will do (such as an old book that isn't of use any more - an out of date encyclopaedia, a second hand book with pages missing, etc. - would be sources, but not the only ones).
The bottle modgepodged. This was a learning experience, and one of the things I learned was I should have used smaller pieces of paper in order to go around the curves a little easier. On the other hand, the wrinkles do make it look a little more "vintage". I left mine white, but I have seen others "antique" with products presumably best found at a scrapbooking store.
I glued in a small amount of spanish moss, to give the fairy a woodland-ish base. This stuff tends to be nasty filthy to work with, but it does look attractive in the bottle.
The fairy, neatly cut out. I was going to leave all the drapings of the dress, but with the glitter process (ah, come on, you knew glitter was going to come into this discussion sooner or later) it kind of mucked the detail up a bit. To save her, I cut the diaphanous gown a little differently, and got an unexpected movement effect that I quite like, so it is all good.
The glittered fairy, plus the fringing I did on the dress. The glitter I used was glitter glue, which kept the mess down quite a bit, although without sealing the paper first you do run the risk of smudging if you aren't extremely careful and patient. The glue adds a little structure to the paper, which is good.
The trick with the fairy in the bottle is to attach her to your background before you jam - I mean gently position - her into the jar. I used twigs as a base. We had a lovely windstorm a week or so back, and there was a lot of windfall of twigs and branches, which I collected. One of those few "free" things you can get, and no one really cares if you take the sticks away (because otherwise THEY have to pick them up). I tied the twigs at top and bottom first, cut off the excess length (measured against the jar ) and then started gluing. I have used a number of silk flowers, plastic flowers, bridal floral picks, miniatures, nail art decorations, dried botanicals and paper butterflies to decorate out the scene. I got a little too festive however - remember if you use a small necked bottle, the stuff you put in through it has to FIT in the neck of the silly thing. Mine did, but only just, and by "just" I mean - I crammed that puppy in and then repositioned the bits with a knitting needle. Any port in a storm, or perhaps sherry - your choice.
The fairy in her new home, in the undoctored bottle.
Getting jiggy with lace and roses. I had that lace in my stash, which is a minor miracle in itself.
The bottle after I went after it with a glue gun, silk flowers, and sparkly floral picks. At the dollar store I found a nice set of earrings that really worked nicely as a lid decoration.
A close up - Preeeeettty! Again, you could do just about anything with these - a mermaid in a bottle, for instance, or your favourite star, your kid, etc. You don't have to buy the bottle specially either - we are usually inundated with bottles that hold things like barbecue sauce, drinks, etc. Instead of tossing them/figuring out where they are supposed to be recycled etc., you could repurpose and use up bits of your stash that is a bit too big for miniatures in general. I thought this would make a wonderful able centerpiece for a certain themed wedding as well. As I said, romantic images, like the fairies, seem to be the "in" thing right now.
So, what else have I been up to? Well, as I mentioned, there are a lot of little fairy things to be found - I bought a couple, just because of the novelty of actually finding miniatures in a mainstream store...
I think he will work well for my mushroom house. I might modgepodge that as well.
Don't blink! Okay, if you were a Whovian, you would be ROFLAO right now. Cute little fairy though. They also had little fairy doors, cute little furniture, cute little houses, cute, cute, CUTE!!! OMG cute. Did I mention, cute?
Little fairy garden marker. Just in case the fairies are confused, I suppose, as to just where they are at the moment. Like the flowers and plants aren't a dead giveaway....
Okay, a little more work done on my German Christmas village. I haven't worked on it for awhile, which is silly because I think the church is the only thing I have left to do before I start putting the market together. I still have two more towers and a few decorations to add, and I can get to the good stuff of "putting it all together".
On a final note, tonight I will leave you with the original fairy in a bottle tutorial I was working from today. It is about a half an hour long, but condensed quite nicely by the youtuber (youtubian?).
Strike up the music, dance and sing happily, my friends, until we meet again!