MECO Show and Sale

MECO Show and Sale
2016 Show & Sale will be the Saturday 14th May 2016 held at the Peachland Community Centre in Peachland BC. contact person Barb Janes-Yeo at 250-757-2842 barbandpaulyeo@shaw.ca

Sunday 30 December 2012

No Virginia, Rich Little wasn't the father of Impressionism...

A Claudia Hansen Post Impressionism piece "Summer"
May the Goddess help me, I am an Impressionist. Well, maybe modern Post-Impressionist, anyway. I start out with good intentions of making something "photo realistic", but then the right brain viciously elbows the  left brain right in the nose and takes over the show, all while poor left brain whimpers in a corner, waiting for the blood to stop. 

The right brain took over right there, did you notice? 

Occasionally I get an overwhelming urge to paint. This summer I even did a little "en plein air", loading my packsack with paints and such, and headed out to a nice little beach where I painted the morning away. I was finally chased off by an impending storm, but what a rush. I was told later that "en plein air" is "hard". Good thing nobody told me that first. Okay, granted, you deal with weather, stuff falling in your paints, small children using the bush you are currently painting as an impromptu washroom, etc., but nothing can compare with the feeling, and what inspiration can be had sitting outside, soaking up the day and the wonders (outside of the red faced parent rushing little Billy and his nervous bladder off out of your  line of sight, of course).

I felt like doing a little painting  (did you see what I did there? No? Well, you will ) this weekend. Unfortunately, I am not prepared to sit outside today as it is December out there, and when your paints freeze it makes it a bit difficult to be creative.

My journey started with a canvas. This past summer I happened across some very nice little prepared canvases, just the right size, that I bought from a large box store specializing in crafts, and dreamed and plotted what I was going to do with the sweet find. Admittedly, I have no idea what I have done with them since, so I fell back on  my extensive grade 10 art  class training  (translation - we spent a whole hour on it) in "how to prepare a canvas". 

Stock Wood from Hobby Supply Store
Drawing out a pattern
Using my trusty geometry set and my Santa pencil (optional), I mapped out the outside lines of my canvas. The overall size will be 2 inches by 3 inches (5.1 cm x 7.6 cm approximate).

Frame lines and stock wood for frame
 I then drew the frame line by marking off one-quarter of an inch (0.64 cm) on all sides. This was the size of my frame stock wood. Handy tip - paint your stock before you cut it, and you won't then have to paint little fiddly bits of wood later on. 

Wood with painter's tape
 To keep my edges sharp, and to keep the area where I will be finally gluing my frame down, I have taped off the framing area. 

Gesso'd canvas
 Back in that  Grade 10 art class of which I spoke, we used Gesso to prepare the surface of the canvas . It makes for a nice smooth and sealed painting surface, and it can be sanded down as well. I coated my canvas with two thin coats of Gesso, letting it dry in between coats. One word of warning - depending on how thin the wood is, the moisture could cause warpage. After the Gesso was dry to the touch, I put something heavy on top to flatten it so it could cure.

Sketchy-sketchy
Once the Gesso was cured enough, and the board was flat enough, I sketched out a general idea of what I wanted the picture to look like. Don't get too caught up in your drawing though - paintings do change (see right brain comment above) once the paint is being applied. 

Adding the Sky
 With a sky, you want to go from a darker blue, to a lighter blue, with the lightest around the mountains. I used Cerulean blue, Ultramarine blue, and white (as recommended by the painting guide I used) , and brought down the sky with a wash. 

Adding the water
 I have started adding the water. I have been told that water - to get the right look of depth - starts out dark in the background, and fades to the lighter colours in front. It is a little harder to do a wash right in this scale, just as a caveat. You may have to water your colours down with water, or use a Gesso  to dilute and as a paint extender (so it isn't drying faster than you can paint the picture, and in small scales, that paint is going to dry aggravatingly too fast to get the blending effect you may want). It was also recommended not to put too much detail into the reflections, as it is a little jarring for the eye - once again, the great Scale Master and his roving band of Painting police are looking over our shoulders. 

Adding Mountains and background
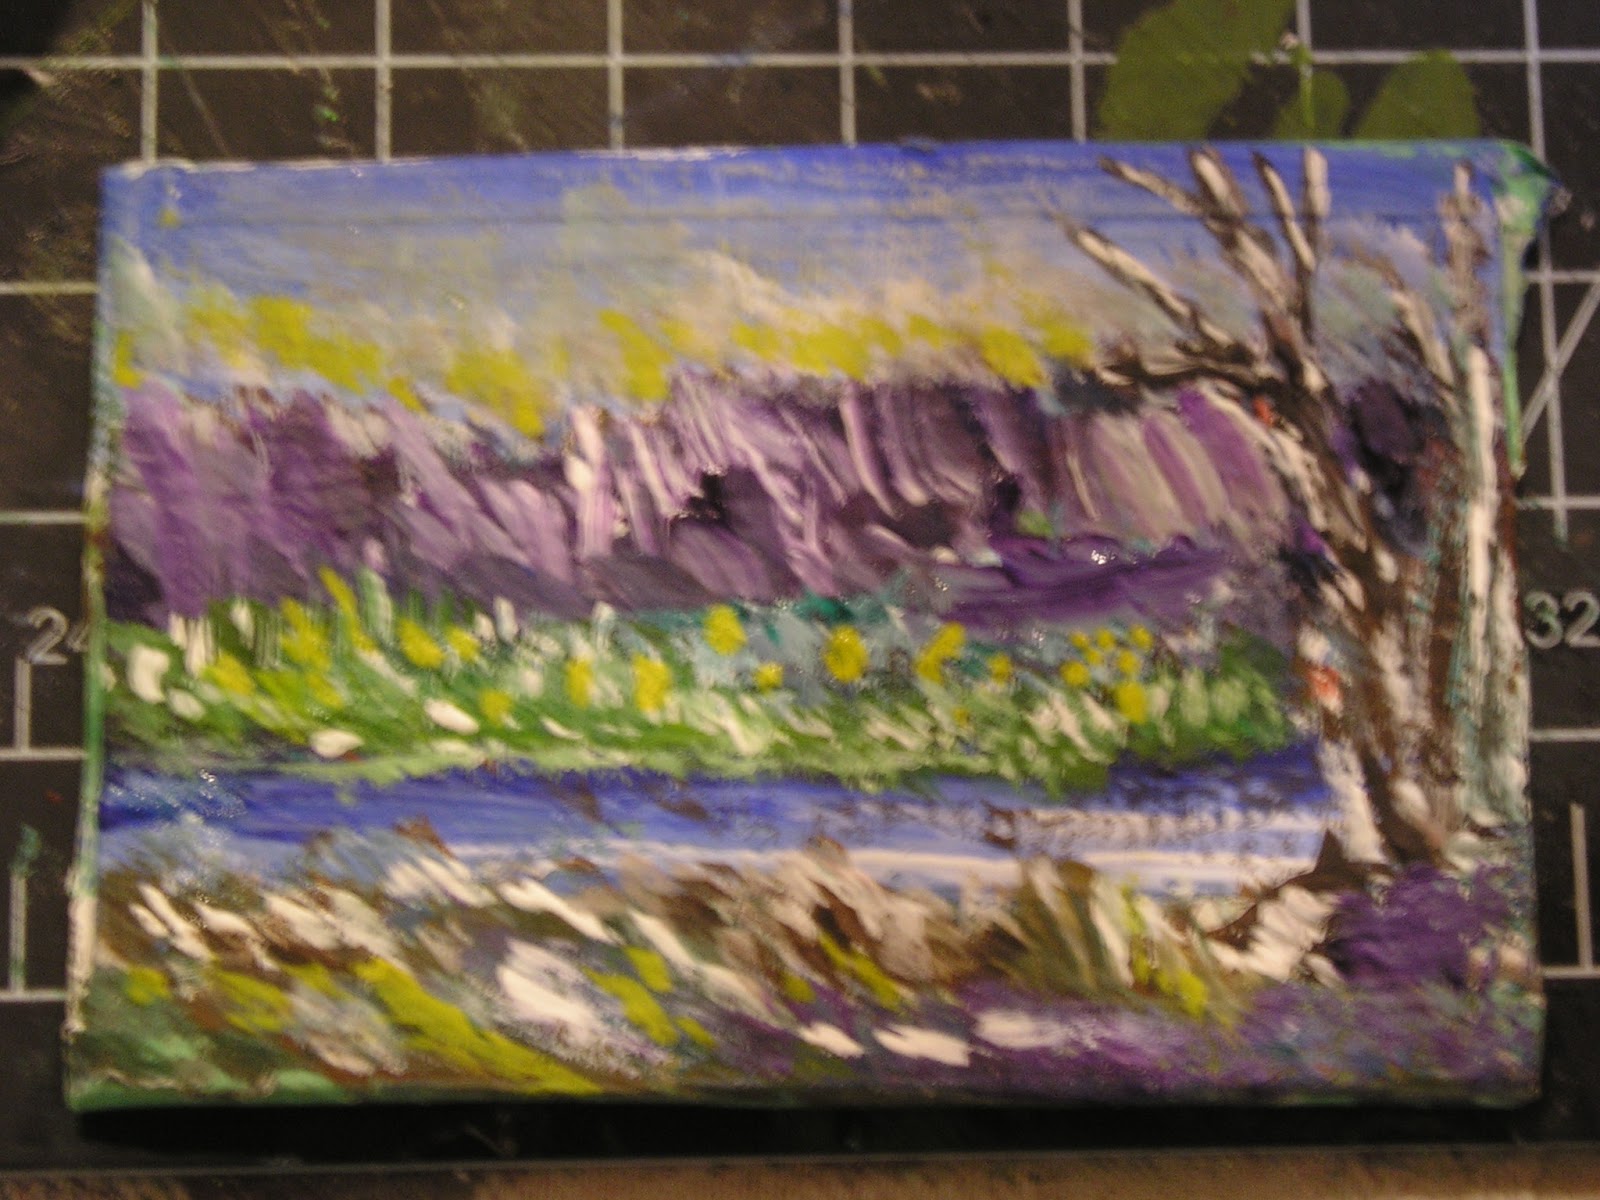
 Successful painters use the power of 3 - background, mid ground, and foreground. You are always working from the "back" of the painting towards you. Shapes and colours are first, and details come in second, highlights and other finishing touches come in third. Don't get hung up on too much detail all at once. Having said that, as an Impressionist, you can break the rules and when anyone complains, you can say "um...Impressionist?"

Adding interest
I used artist's paints, which are geared more to this kind of painting. You can use craft paints, if you so desire and if your budget won't accept the cost of the good stuff, but I do like the quality of the artist's paints and they actually will last longer as they are sealed better. 

Having gotten to the point where I could rush headlong into the details, I started to play. One thing about painting is that you have to be strong enough to walk away before you go overboard - I think today  I didn't quite walk away in time. Still, no biggie. You don't learn if you don't try.

Painter's tape removed
 Once I was vaguely satisfied with my picture, I removed the painter's tape. Now you can see the nice crisp lines. You could stop here if you want (such as if you are making an artist's studio, and unframed work would be more true to such a scene) , with possibly adding a little matte gloss to protect the colours (acrylics are bad for fading, oils are better but oils can be a pain in the posterior with respect to drying times - it all boils down to personal preference and patience levels). The gloss will also enhance the colours, but again, your choice. 

A note on paint choice - acrylics tend to be a more forgiving medium, in that it is easy clean up, minimum fumes, and a little easier to work with. Oils take a long time to dry, but the blending opportunities are amazing. Water colours  are a difficult choice of medium to work with, but the effects can be worth the effort. In short, its up to you, bub, which one you want to play with. 

Cutting out my frame
 Frames are pretty easy, if you have the right tools. I am doing a little cheating here - I have cut my mitre on one side, lined it up on my painting, and will make a little tick mark at the corner where the paint ends. That tick is where my bottom mitre will happen.  Granted, I am breaking rules of carpentry here by not measuring and using math and other such voodoo, but with items so small you can get away with it

Mitre Tool and painting being framed
 I find these little mitre tools to be fabulous, as you get the control of a scissors and they cut balsa and basswood like a treat.  They have a cutting guide, and the 45 degree angle that you need for a mitred frame is already set up for you on the tool. Mitre boxes work, but you don't get the precision and control in small scales as you do with the tool. One tip, always be consistent where you cut - be it on the line, before the line, or after the line, because that *is* where you will realize that your frame is just a little too short, a little too long, or a little off square/rectangle when you put the whole thing together. Also, remember those three little magic words that make the world go round - i.e.  "dry fit first".

Framed!
 There you have it, a cute little framed painting. If you are not a painter, of course, you can do cheats by reducing any image, mounting it to a board, and framing it out the same way. 

I found something on Youtube that is great inspiration as well - this painter does break the "not too many details" rule...beautiful!


Have a great New Years, and we will see you in 2013! 


Sunday 23 December 2012

And Thus We Enter An Age Of Peace ...

Matt Smith aka "Eleven"

Well, that is another Apocalypse season tied up for another year. It just seems like we had the rapture not that long ago and already we are looking at the Mayan apocalypse in the rear view mirror. My, how time flies...Or doesn't, it can be a little wibley-wobley that way.  What's that you say? What am I talking about? Well, Dr. Who, of course. Still not clear?  Not to worry, I always take care of my own - have a watch below of 47 years of Dr. Who to get caught up.  Go on. I will wait. 


Ah, that's better! Really a straight forward show, is it not? 

Whovian Overload
 Okay fine, it is a whole lot of show, but that's why we Whovians love it so, and why I am counting just as much down to the DW Christmas Special as I am to Christmas. Eventually I will be doing a Dr. Who tableau (although I do have a few DW references I have snuck into my work already...but that is for another day).

Anyway, I think my greatest disappointment about the Apocalypse is that I suppose I really have no excuse but to clean house now. Oh well, I am sure another apocalypse will be coming shortly and I can slack off again. 

We can also get back to Christmas, as it isn't like I haven't spent the last month on it or anything. Perhaps today we will take a look to see what the MECO Crew gets up to when it comes to Christmas and winter themes, shall we? (Yeah, like you have a choice...insert evil laughter here). 

Christmas Tree Scene

This is so sweet, and again - no clue who made it, but I love the colors and the story.

June's Pony and Sleigh
This tableau was done by Member June. I believe she started out with a Breyer horse and remodelled it.  The detail on this little model is exquisite, right down to the traces. She even has some broken branches beside the sleigh, which of course always happens when you are loading and unloading a pine tree. I want this but so far she hasn't just outright given it to me. I think it is just unreasonable that people just don't give me stuff because I like it, but I guess those are the breaks. 

Sleigh
Isn't this just gorgeous. I have a soft spot for horse drawn vehicles, almost as much as for the horses themselves. Sleighs in themselves are very romantic things, it brings to mind sunny crisp days where the snow covers everything like royal icing, and we think of  happy singing that is accompanied by merry bells, perhaps a big mug of hot chocolate and shortbread at the end of the ride - no one ever tells you that you are not getting the prettiest scenery,  considering you are staring straight up the back end of the horse and all, and I have to tell you - horses aren't polite about natural bodily functions. Not to mention a sleigh ride on a bitterly cold day will make you never want to go out in one ever again (or for that matter outside ever again ) but...I think today we will listen to the poets, and not the realists. 

Two team Sledge

Another working team. I always have had a big soft spot in my heart for the big draft horses, so this is another one that Member June won't just be handing over to me because I like it. 


Christmas Rug by Kimi B.
 This is a little rug I designed many years ago. I used very tiny cross stitch patterns from a book I found with tea towel designs - never discount big patterns because you never know what you can scale down. I tell the truth when I say I like sleighs, because low and behold, there is one in the top centre. I used graph paper to put down the original design and voila! Some of the bordering may have just grown organically as I did do a little design while it was on the hoop.

Poinsettia from Barb
 Two things - at long last I figured out how to use my camera, just moments before it became obsolete. I have only had it for 5 years. Second, when you can get in this close to a miniature and not have it look like Fakey McFakerson from Fakeslyvania, that is a quality miniature. 

Christmas Stocking by Kimi B
 This is one of my stockings, knit from a pattern in a magazine. I have been crazy enough in the past to actually knit these things on 4 needles in order to do away with the sewing of the seam, which is my least favourite bit, mainly because it slows me down. Life is tough for the extreme knitter, as you might well imagine. 

Gotta Post Card, with a Chimp-an-zee...
This is another one of my knitted toys. I adapted it from a baby layette pattern, the above sock pattern, and of course my own spirit of "lets see what happens when I do *THIS*!" (people duck and cover when I say that out loud, I am not sure why). Not a real sock monkey, of course, real sock monkeys are sewn from ...well...socks. But I still like him. I made a twin of this one for a lady in Texas, who wanted the more classic red heel built in. This fellow I was just being lazy by not adding just one more colour. Still adorable though, even though I do say so myself. 

Christmas Carol
 One Christmas, back in the heyday of on-line mini swaps and probably more than a decade ago now, I participated in a Christmas swap. I made 12 of these little girls. I think I varied the dresses - there were green ones as well as red ones.  She has freckles, and beautiful ringlets (embroidery cotton which was wrapped around a knitting needle and "set" with glue).

Swap Swag
 These are some of the swaps that I got back, minus the teeny little snowman, which I made from polymer clay and a bit of embroidery thread. I think there are more of my gifts kicking around my house, put into other projects, so not available for the photo shoot.  


Centerpiece
This is a centerpiece that I received from member Marianne a few years ago for a Christmas party gift.

Stockings and a plate of cookies for Santa
 
This was the rest of my Christmas gift that year. Very generous indeed. Note the tiny presents in the stockings, as well as the beaded embellishments. 


Snowman centerpiece by Marnie
 Look how sweet this centerpiece is! There is the penny lurking below, just to give you scale. 

 And with that, I have exhausted Christmas, and just in time as tomorrow is Christmas eve. Here is hoping that Christmas finds you in the company of hope and cheer, and may your new year be bright and brilliant. 

Merry Christmas, and until we meet again! 


Sunday 16 December 2012

...And Since We've No Place To Go...

'Snow Wonder
Two weeks ago, I was riding my bike without the need for a winter coat,  and would you look at it now.  Granted, there are still people out there on bicycles, but I have to wonder about their life choices on a day such as this. The snow does put one in a bit more festive mood, however,  even if it does put a little more edge to people's teeth out in the malls, especially this second to last weekend before the Big Guy arrives. No, I am not talking about your Uncle Ed. I am talking about this guy...

Santa! I know him!!

So hopefully Christmas is just about sorted, gifts  and/or cards are bought/made, wrapped and mailed, trees trimmed, cookies baked, and the big feast planned at this time so you can kick back  with an Egg Nog Latte and enjoy the mad scrambling of those who are not as organized as you are .  I am at that point right now - more or less - and it is always a relief when you hit the "done all I can, nothing left to do" stage. So I treated myself to a project for me - a little Christmas kitchen. 


 I came across the pattern on Quarter Connection (a Yahoo Group, free to join, and you do have to join if you want their project  but certainly you can strike out and make your own, see below).  This example uses bashed Cheap Brown Furniture (CBF), printies and little accessories.  It is meant to fit into one of those little clear plastic photo cubes, but can be adapted to any container.  The basic structure is very easy to make - I used matboard, which was cut into 3 equal sized squares. 

Matboard squares
These squares are 3.25 inches x 3.25 inches (8.25  cm x 8.25 cm) - this is an "ish" measurement - you can make them any size you want, just as long as they are square and are going to fit into your container. The technique can be applied up the scale chain, although remember the bigger the scale, the heavier the building supplies will need to be. For quarter scale, though, matboard works like a charm. 

Wall paper and flooring


This is the wallpaper and flooring I used from the site, but you can create your own, or if you are fortunate you might be able to find a small enough printed scrapbooking paper that will work. Jim's Dollhouse Pages might have something for you, or one of the other printie sites as well.  


I cut out first the wallpaper and applied it to the matboard. Tip - you might have better success with a gluestick in this scale, as white glue tends to be a little too wet and will make the paper buckle a bit and can make the ink run. However,  that is not to say white glue is verboten - if you find yourself stuck for choice  you can use white glue, but you (yeah, I am pointing right at you, you know who you are)  just have to go sparingly and spread evenly so you don't "drown" your paper. No one wants to come to a "sticky end", as Member Rosemary is fond of saying.

Flooring in process
I wrapped the matboard with the floor printie much like a gift. It just makes for a neater edge if you wrap the paper around it. Again, go sparingly on the glue. 

Stage Built
At this point, I took my can of trusty fixative and sprayed the stage. It isn't "necessary" (and certainly if you have chemical sensitivities this is not the step for you) but the colours will be less likely to run and fade if they are fixed.  It also allowed me to "varnish" my wood floor, so it had more of a finished wood floor feel. 
Seeing What Fits
I didn't have the CBF in arm's reach today. I am sure I have pieces, but where they have made their way off to, I don't know. All I had were those two little chairs, which I am not going to use. What I did have, however, was a resin set I bought from a store in Edmonton a few years ago, that came from a miniature shop in Tennessee. I liked this set too much to just have it sitting in a house somewhere engulfed by other details,  it really needed to be a stand alone. I was going to just make wood cupboards, but something in me just screamed "cop out" so I went full frontal Christmas on the set. 

Prepping the Furniture

I gave the furniture a light coat of paint first. The resin is pretty forgiving. I went over the cupboards with green and red -  I am actually pretty pleased with it, although the pictures seem a bit dark. It gives that Christmas feel, but not the "in your face" red and green holly jolly that it could have been. I have seen kitchens with this colour combination, oddly enough. I gave the stove a copper fume hood, just because I like copper fume hoods, and it references "Sound Of Music", just a little (ala Raindrops on roses, whiskers on kittens, bright copper kettles, and warm woolen mittens). Several of you are now singing the rest of the song, admit it.

Test fitting kitchen in to space

Quarter inch  - and smaller scales in general - can be a tricky,  in that if you get 3 smaller scale miniaturists in a room, there are going to be 3 different opinions on what the scale actually is - for example, I have itsy bitsy 1/4 scale chairs, and then massive hutches,  obviously not able to go in the same tableau and yet they were  marketed as 1/4 scale. A layman might think  - how can it be different, it is one-quarter the size of what it is supposed to be, why the arguing? At which point he would be banished from the room to think about what he has done. It is a mystery why we can't seem to decide on a standard (and again, it isn't just the 1/4 inch crowd, there are very specific camps of scale when you get into babyhouse territory). Full one inch scale has resolved some of the arguing over the years as techniques and people's quest for realism has become more sophisticated,  so maybe it is because the smaller scales are just are newer (relatively speaking) and with new lands you need those who pioneer and settleThe rule of thumb in any scale, however, is keep "like with like",  and it will keep your eye from reading it wrong.


Anyway,  I thought this tableau had a better feel than some of the pieces I had in my treasure boxes. The cabinets of course haven't been attached yet in this photo. 

Kitchen in progress
This is the little box with the cabinets "mounted". I think that is a good place to stop today, no use doing too much and rushing the job, and anyway what contractor EVER gets the job done in one go? (awaits angry letters from good contractors now...)  It is shaping up pretty good though, even if I do say so myself. Think I need a nice hot chocolate, you are welcome to join me if you have the time.

Until next time, gentle angels...
Need a bigger tree, or a smaller doll's house...