MECO Show and Sale

MECO Show and Sale
2016 Show & Sale will be the Saturday 14th May 2016 held at the Peachland Community Centre in Peachland BC. contact person Barb Janes-Yeo at 250-757-2842 barbandpaulyeo@shaw.ca

Sunday 17 February 2013

Road Runner, the Coyote's After You

Sometimes I just identify with the Road Runner, and this week has been one of those times.  All week long, I felt like I was racing ahead, just barely out of reach of those in hot pursuit of my time and occasionally my patience, and it didn't look like I was ever going to enjoy my birdseed in peace Needless to say (although I felt the need to say it) , there was stress to relieve this week, and I kicked it into overdrive. 

To start, I couldn't leave my train set alone - it just needed "something". Aha, I thought - a backdrop! So out came the paints, and I set my scene amongst the majestic Rocky Mountains.

Lionville Station, located near the Rocky Mountain Trench

Made a Waterfall!

Close up of Detail
 The backdrop was not that difficult (sez me). I cut a long piece of matboard, length determined by the base, and then started with the sky, which washes down from dark blue to a lighter blue. I used gesso as an extender and also for the white colours, and a sponge brush.  The mountains were a mix of prussian blue, gesso, an a darkish purple. The hills coming into town started out with a darker green, washing down to the lighter colour (tempered with yellow and gesso). Easy, no? Just like those "draw this picture!" cartoons that start out with a circle and 3 sticks,  and 3 drawings later there is a photo realistic picture of a lion taking down a wildebeest and you are left to wonder, how'd they do that? Yeah, easy like that.

I made the waterfall by extending the blue colour of the river over the side, and I used my trusty "Triple Thick" varnish once more. I decided a little river was going to run by in the front, and I did the water treatment again. 

The clear acrylic box was from a Valentine's offering of Ferrero Chocolates. Keep an eye out for those boxes, the company often brings out very interesting shapes of boxes for holidays. 

The paint was barely dry when I started a few things more for my Washtub Cottage. 

Simple Dresser


Tick Tock Grandfather Clock and Writing Desk

Kitchen Cabinet

What I have Made So Far for the Cottage
Told you I was stressed. So, I have made 7 out of the 33 projects in the book so far - boo-ya! 

Then Valentines Day happened. I was given a valentine, but of course what do I see? Potential in the wrapping, that is what! 

Valentine's Bag
 This little bag is a fairly heavy cardstock. Unfortunately I had to do away with the top portion as it was taped somehow and of course that started to come loose, and it couldn't just come loose without some of the pattern. So, off with its head! 

Bag with Cut Out Window
 I chose a size for the window, which in this case was about one inch away from all sides. That way I didn't have to centre anything. It also means that when I put the insert in, I can raise it up to the window, instead of trying to cut to the floor. Happily that one inch lined up with the white stripes, so that made it easy to get a straight line.  Eventually I will put a "window" over the front to dress it up, but as I forgot to look for something suitable while I was at the art shop yesterday, that will have to wait.

Foam Core Insert
 I built a foam core insert to go into the bag. That way I could just build as a room box, and eventually slip the insert into bag, without having to work inside the bag.  It took a little fiddling to get proper measurements, but eventually I got something I was satisfied with. Just remember to leave 1/4 of an inch (or whatever the width of the building material) on the sides of the sides so your walls can slip in nicely. I made the back wall flush, and the side walls extend past the floor to join with the back wall (so that 1/4 inch or width measurement has to be taken into account once again)

Walls, Papered
Initially I had the box put together, then I realized ... I am going to have to paper these things, and since this is fussy to go around corners and match up patterns, I really should do the pieces separately, as above. I used a paper printie I found from Jennifer's Printable's site, which has enough printies to keep you busy for awhile, with wallpaper and projects galore. I believe she brags of 200 different papers. You can also make your own, and she has instructions of that on her site as well. 

The print I chose was checks. I realized the little bag was pretty strong as a pattern, and I felt this pink and white check was going to work without deafening anyone, a bonus in any situation.  I chose a floor pattern to compliment my checked wallpaper as well - it isn't strictly flooring, however, but cherry themed wall paper  - we don't always have to stick with tiles and hardwood flooring, although it does tend to rely heavily on the look and style of the project in mind. As this is more whimsical, I can get away with "wall paper as flooring" without someone coming up to me,  sniffing pretentiously while rolling their eyes,  and telling me that I totally have mixed Valentine heart motif periods and it isn't historically accurate, doncha know. Well, okay, maybe not totally "get away with" - certainly you always get one who has to comment. I usually  just point and laugh at them, though, and eventually they get embarrassed and walk away.

Check Wallpaper and Cherry flooring
  
The Insert in The Bag
Okay, time to decorate. I found a nifty Joanne Swanson blog that is just packed with goodies, including a Valentine's Day Party (see below).  For those of you who have never heard of her, she is brilliant. Ms. Swanson has been on the miniature scene since  before I started in 1994 (okay, I see you doing the math there, so just stop it), and her approach to miniatures is one I have always appreciated - i.e. you shouldn't have to buy pre-made in order to play.

Joanne Swanson Project
 She has a brilliant how to for almost everything in the picture.  I was going to go 1:12 scale - which I have to admit, looks massive after building smaller scales - but the room box is so small, I decided to take it down a step to 1:24 scale.  It is not a scale that I have done a lot of work in, but that has never really stopped me before.

(L) 1:24 scale chair (R) 1:12 scale chair
Here are the two chairs I made, one in 1:12, and one in 1:24. Definitely a big difference in the size, just by halving it. I used the same size wood and just half-dimensions. Not too shabby, if I do say so myself. 

As an aside, here is a little trick I use when I am building something like this that has a dozen or so pieces that have to be very accurate - I tape together my wood stock (not the bird) with painter's tape. I square off the ends with my wood cutter, and then make my measurement. One can attach several pieces of wood together in this manner and not only save time, but also cutting errors, mismatched sizes, and wasted supplies.  I have done this with straight cuts and with mitres (in making frames). As well, with chairs, there is likely going to *be* more than one made, and you want your chairs to mostly match and you don't want to start at ground zero for each and every chair.

Very Handy Wood Cutting Tool

Wood Prepared For Multiple Cuts
 Part of the chair project instructions had me using a small valentine for the chair back.  I was lazy - instead of resizing the original pattern, I used some heart stickers that I bought from a craft store last week. 

Sparkly!
 They were exactly the right size for the 1:24 scale chair, so you can't beat that with a stick. Or perhaps you can - I don't judge. 

Finished Chair
 Granted, this isn't the most comfortable chair, but then again I haven't heard the miniature people complain, so it's all good. Plus its sparkly. I painted the chair a nice white. I liked the red and white stripes of the chair in the original picture, but it would have been just too much with what was going on with the various patterns already. The cushion is a piece of fun foam that was cut and upholstered with a tiny bit of fabric. 

Chair Compared to Last Week's Valentine
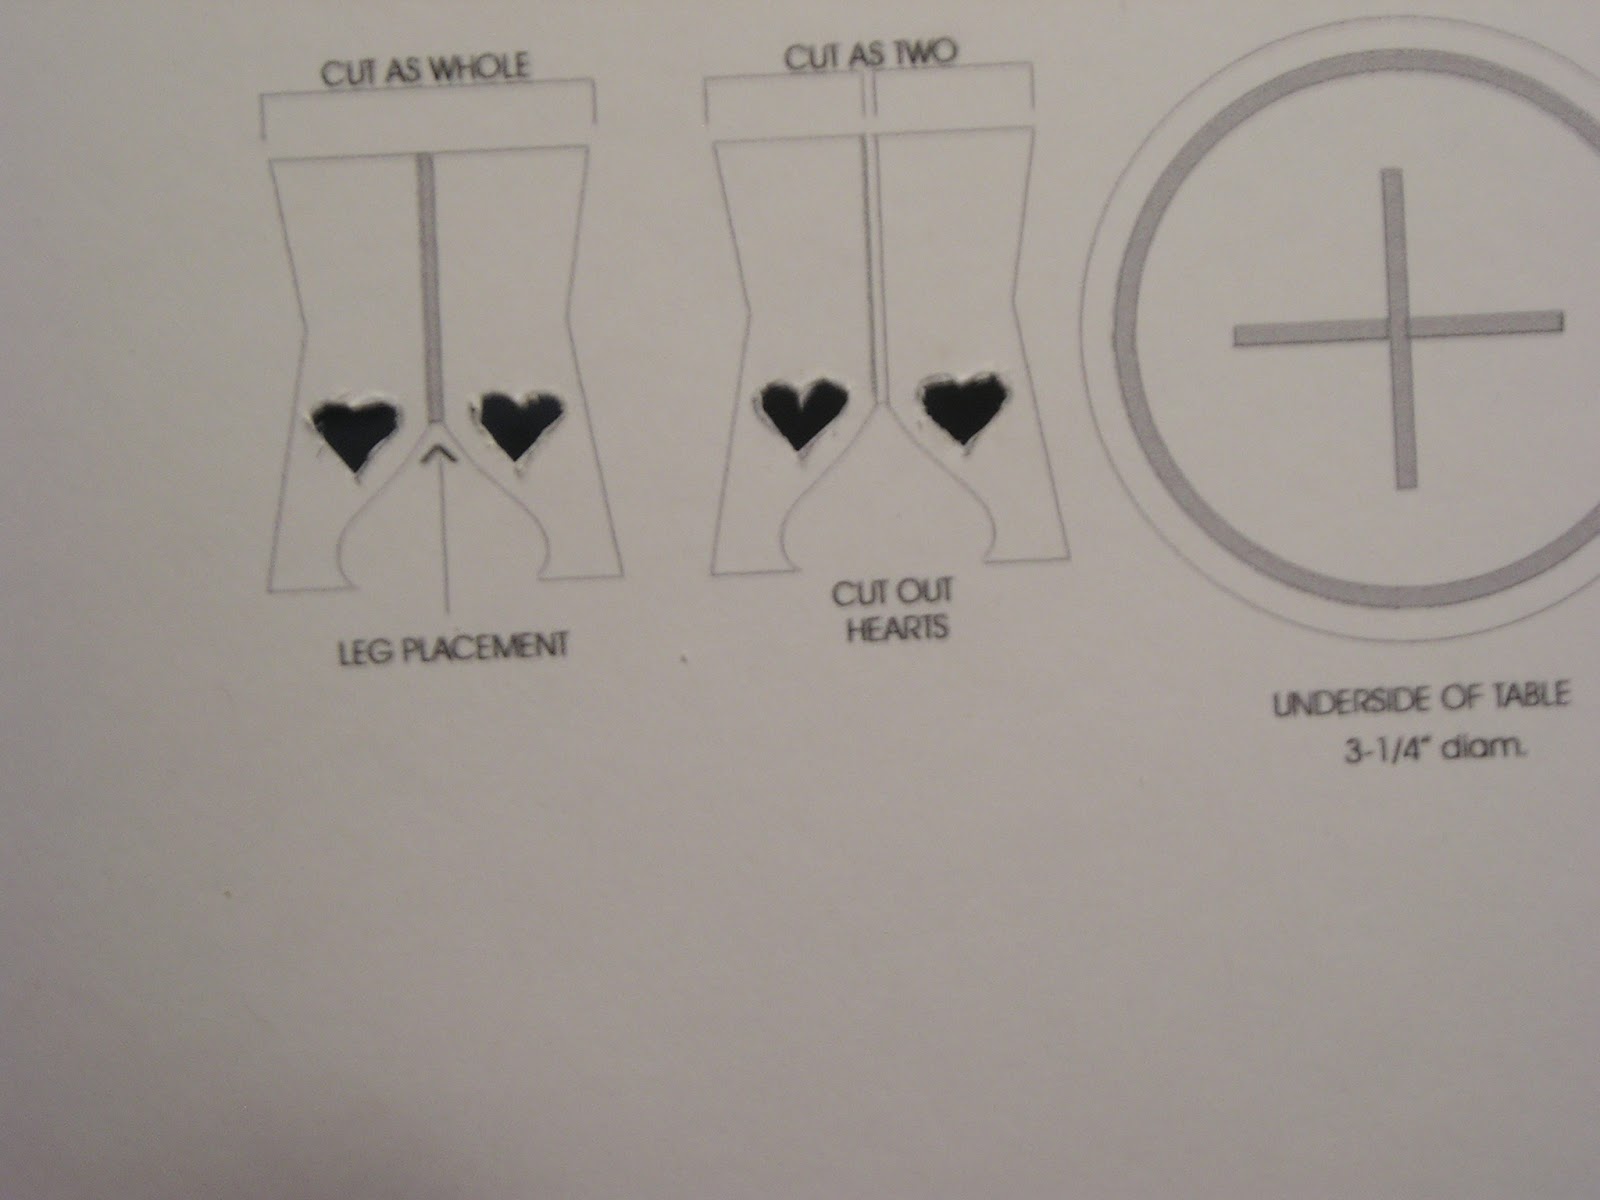
The Table
 I decided I could get away with a cardstock table, as it would be the right thickness for the project. Before I cut out the legs and the table top, however, I cut out the tiny hearts of the legs first - that way I had something to hold on to as I cut. It would have been better with a heart punch, but mine is still M.I.A.

Table and Chair In Situ
 Here is where you can see the importance of not candy striping the chair legs - definitely needed a contrast against all the strong patterns. I haven't finished with the table yet, but will work on that later. I think that is pretty darn good for my week's work, and a good place for all that stress to go, don't you think? 

Just in case I haven't put you on your own mini bender yet, however,  how about a nice video of a Valentine Day Cake how to to seal the deal?


Until we meet again, kind friends...!  
 

No comments:

Post a Comment