2016 Show & Sale will be the Saturday 14th May 2016 held at the Peachland Community Centre in Peachland BC. contact person Barb Janes-Yeo at 250-757-2842 barbandpaulyeo@shaw.ca
St. Valentine Stained Glass Window - Unknown Artist
Valentine's Day is upon us once more. Also Lupercalia, but we will forgo that for the moment as this is a family show. I like the thought of Valentines Day - how nice to have a day where you show a little affection, or even a little more affection, to a fellow traveller of this road we call life. It doesn't have to be romantic intent, either, although I know people get a little caught up in that, and it doesn't have to be a pocket-draining exercise - I think we all know the debbie-downers who whine and snivel about it being a "card holiday designed to line the pockets of <fill in the enterprising company name>" and toss around meaningless little phrases like "I show you I love you EVERY day" - suck it up, buttercup, and go get the darn flowers and candy already, honest to Benji, what is wrong with you? Cough. Anyway, what was I saying? Oh yes, a little good will (and potentially some chocolate) can make someone's day. Therefore, today I send to you a little Valentine - literally, a little valentine, as we are miniaturists.
Quarter Inch Scale Scene in a Heart Box - Kimi
First, what would the day be without a heart shaped box of candy? There are several ways to go about a heart shaped box. One way is to find an on-line printie - About.com has a few here (modern) and here (Victorian cherubs). This is a good place to start, as Lesley Shepherd has instructions that are pretty much transferable to any design you want, such as what this individual did for anatomically correct heart shaped box. Anyway you say it, say it with love.
Literal Heart Shaped box
If you don't want to do a printie, look around for stickers. Right now they are in abundance at stores, in all sorts of lovely styles. Just apply the sticker to a cardstock, and go from there. For a less fussy box strip, look for quilling paper, which comes in a variety of colours, and can be used for other projects as well. Myself, I went roses and cherubs, as I am all about the sappy love. I am part of a mailing group from a printie retailer by the name of Anne Vanture. She has marvelous items for sale, but if you join her Paper Minis Club, you get a newsletter and a link to freebee printies. This was one of the freebees.
Anne Vanture Printie - Paper Minis Club
The first step of course is to carefully cut the printie out. To keep things simple, I cut as I need a piece, in order to keep small paper-based prison breaks from happening. One tip I can give you for cutting out curved objects is to move the paper as you close down the scissors, as opposed to moving the scissors around the paper. There is just much better control for fine cutting using this method.
Pretty Paper Heart and Strip
The top of the box and strip cut out. The next step was to bend the strip in the middle. Why, you say? Well, I am glad you asked. The strip has to go around several curves, and at least one in the middle at the top of the heart. If you make your bend first, you aren't madly fiddling with it as you glue, and you can pre-curve your paper as well, so you are not fighting with the natural tendency of the strip to stay straight.
Bent Strip
Gluing the Strip to the Top of the Heart
Yay, I ignored my own advice. I also remembered why I was supposed to do the top bend and not the heart point first, it became very fussy. I did better on the bottom portion of the box. The lesson here, of course, is do as I say, not as I do.
Top of The Box
Even though I went against my own advice, it didn't turn out badly. It was just a little fussy.
Heart In Hand
The next step was to line the top with the insert, which hides all the nasty little jagged parts that we don't want to see.
Top and Bottom of Box
The bottom was a repeat of the top. Here is the finished piece. The good news is...I found my Gold Paint Pen! The bad news probably is the same as the good news. The box was black, but I wanted shiny...mmmm...shiny...
Poly Clay
I wanted to make chocolates for my box. There were a few ways to tackle this, I went with some "chocolate" coloured sculpey. In retrospect, it would have been better to go with a dark brown, light brown, and white (just so we are clear, white chocolate is not, in fact chocolate) just to get some interest. One could have also wrapped small beads as well. My favourite wrapping is from Hershey's kisses (tm) but you have to get them during a "season", or you will be stuck with boring colours. Right now they are all red, pink and silver papers.
Blatant Product Placement in hopes of Free Chocolate from Hersheys
I started out just making little chocolate balls. This didn't work out as I had hoped, they were kind of boring. I would recommend getting your own box of chocolates and using that as inspiration, and sustenance should you get really into it*.
* (not responsible for over-enthusiastic research).
Boring Little Balls Of Chocolate
Boring Little Balls Of Chocolate in Glue
Boring Little ...well, you get the idea
I just wasn't impressed with my chocolate skills here. I ripped up all the glued balls, and started again. I went back to my Hershey Kiss Stash (as I am always willing to take a hit for the team) , and started wrapping some of the chocolates, just to give them a bit more interest.
Chocolates, wrapped, and some accented with gold
That is a little better. I am still not extremely happy with my arrangement, but it is the thought that counts, right?
Box of Chocolate
That is a little cuter when you can only see a few of the candies peeping out at you. I also ditched the black lining in favour of red tissue paper. If you get a lot of bagged gifts like I do, make sure you save the tissue paper, as not only is it re-usable, but also you won't have to buy brand new paper for an inch worth of material.
Well, I was also going to make you lovely people roses as well today, but a critical piece of equipment has been misplaced, that being my heart punch. So, I will share with you the pattern, so at least you can get started while I search the universe - or at least that part of the universe closest to me - for that silly tool.
About.com Roses
When they speak of Airmail Weight paper...try perhaps tracing paper, or other artist's fare. I went out looking for this weight of paper and it doesn't seem to exist. One used to be able to buy it as envelopes from post offices, etc., but I have never seen this paper as anything *other* than an envelope. I have tried the following:
It isn't too pricey, and one can always find a use for tracing paper, and it does fit the "translucent" requirement.
Below is a candy tutorial - probably should have looked for something like this before I went gonzo on my own chocolates. It also has a flower tutorial.
That is all for this week. I hope you have a fabulous Valentines, no matter what your facebook status is, and until next time, my treasured readers...
E9A #932 similar to the EMD F3 Diesel Passenger Train from the 1950's Featured Today
Literally all the live long day. I started back making my train set yesterday morning, worked on it most of the day except for a brief interlude to run an errand, worked until 2200 hours before retiring, up at 0700 hours, finally completing it now. On a side note, I once went in to a sleep doctor for a problem with insomnia. The doctor recommended "try to do a craft before you go to bed to calm your mind and trigger your brain's sleep centre". Suffice it to say, obviously this man had never met a miniaturist on a mission.
Of course, this isn't to say I haven't appreciated something to do, what with all that hubbub about some sporting event or other this weekend.
" I think its called the "splendid ball" sir..."
Awesome. Lets get this trip underway! Where we left off, I had cut and glued my buildings, but didn't have my trains done yet.
Passenger Car Before Excision
Passenger Car In Progress
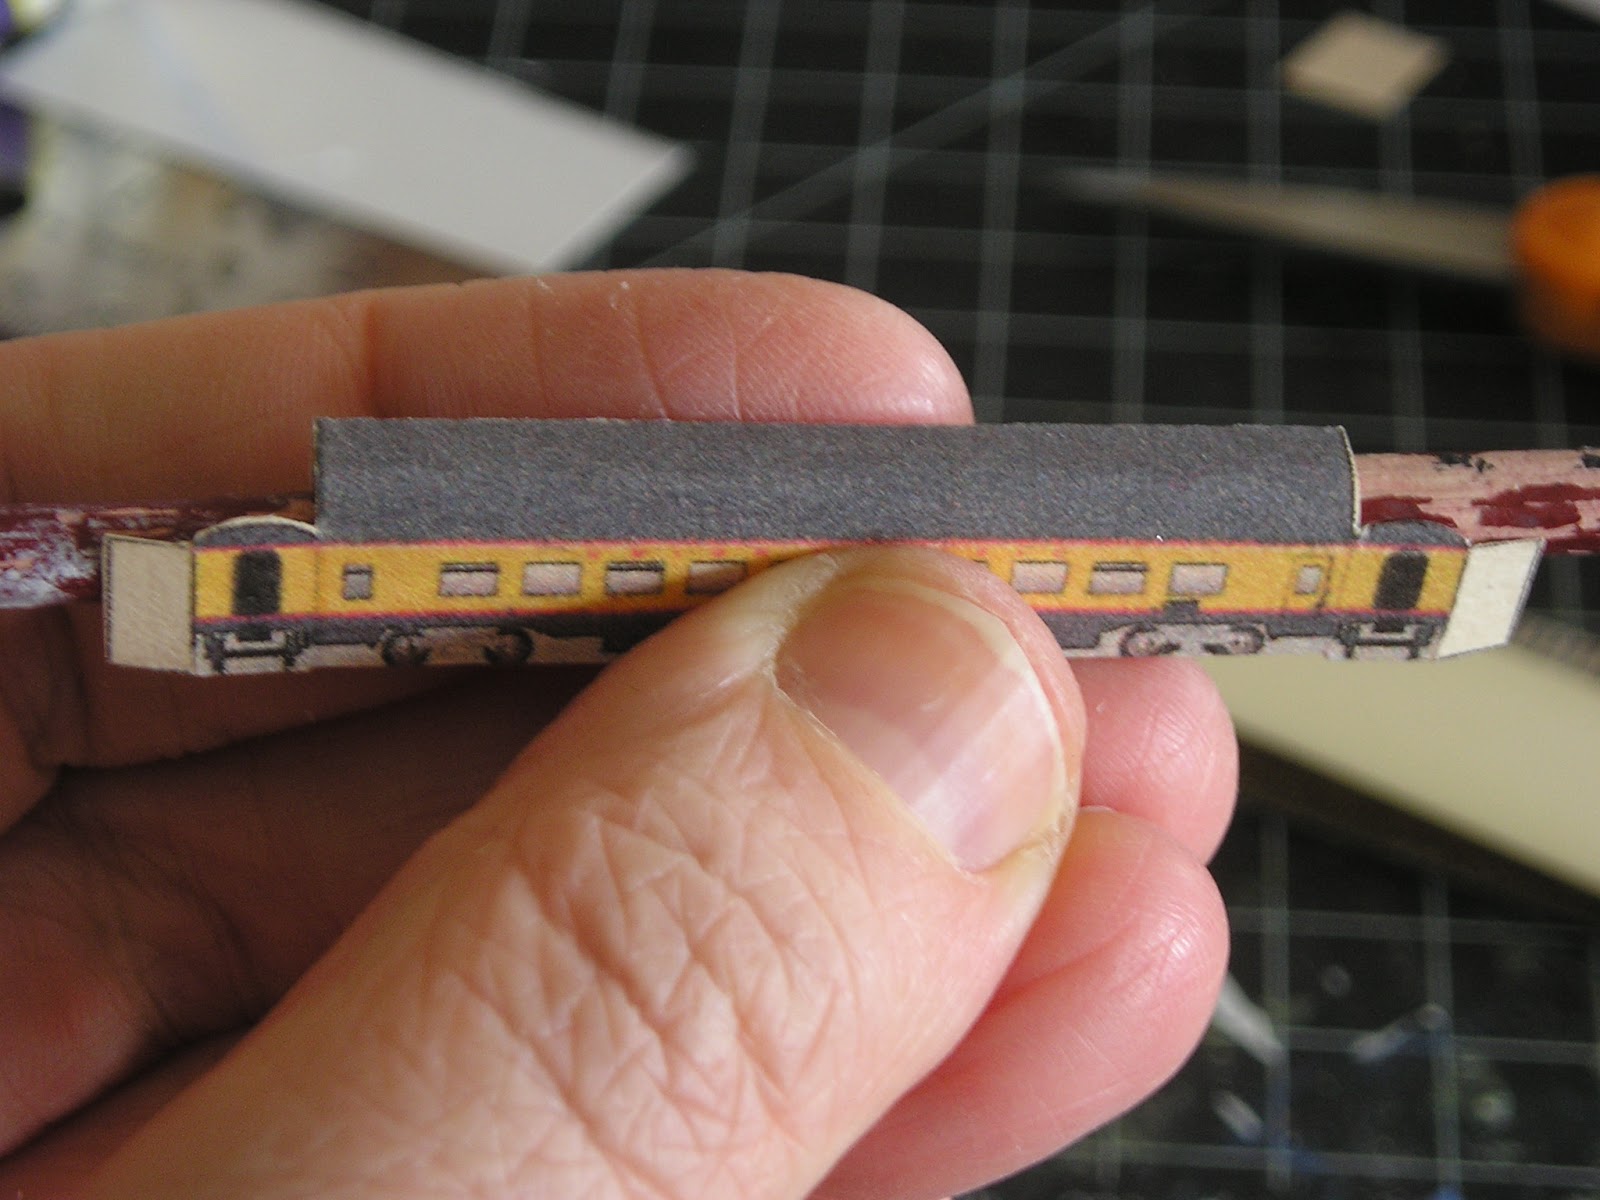
Although tiny, this was a well thought out design for a printie - one caveat was the instructions were written on some of the cars and not others, but if you did the unlabelled cars first and used the others as a guide, things went smoothly. I by and large ignored the instructions (okay, so I usually do anyway), as I found that with the way the cars were designed it was fairly straight forward in how things were put together anyway. The passenger car was essentially a box again, but the roof was rounded. I used a paint brush handle to get the appropriate curve.
Passenger Cars Assembled
I did find the last few tabs to be glued in to be a pain, mostly because there was no way to actually push the tab against the inner wall as there was no access at that point. I stopped scoring the last tabs for that reason, because then the paper would push itself into the right position once the tab was inserted.
Engine
The engine was a tad more challenging, in that it had the main engine piece, the nose cone, and the front panel. The engine itself was barely an inch long, the nose cone and front panel were probably 1/8 to 1/4 of an inch in size... obviously, this led to some challenges in actually holding on to the pieces long enough to get them glued, and before that inevitable moment where the piece springs out of your hand and lands in the pile of waste paper that is now littered around your feet, and of course EVERYTHING looks the same as your "good" piece of paper. Good times, good times.
Little Engine with Passenger Car
Train with Passenger Cars
Town and Train Put Together
You would think that now the tiny structures and trains are put together, that is the fussy bit done, right? Wrongo! Remember all those pictures with the track? It was time to cut all that out.
Making Tracks
Admittedly, I went a little overboard with the track, in the end I only needed a small percentage of what I did excise, but was thankful I had extra track when I needed to modify angles and such. It took me several hours, however, of very tedious cutting. We were given in our project package enough trains and buildings to do a second one, so maybe I will make a different lay out with a different theme at some other time.
Picture of Where We Want To End Up
The Town Layout
I found the layout didn't quite match the angles of some of the tracks, but that was okay as I eventually went ahead and landscaped around any strange ghosts of track later.
Whoopsie
This is what happens when you carry your project bag upside down. Isn't it odd that you can struggle with a plastic sleeve to give up its contents, but the minute you aren't looking everything falls out with no effort at all? Murphy, that wag, has been making rules again.
Layout with "River" Cut Out
To give the river depth, I cut the water out of the layout, traced where it would be on my foamcore, and crushed that area to form a river bed.
River Bed Traced
Making Geography With A Blunt Object
Once this was done, I used some blue paper (provided in our project bag) and glued that into the depression I had just made. I glued the layout on top of that.
Layout, and My Feet, Apparently
I didn't like the flat blue appearance of the paper, so I went in with my Prussian Blue, Metallic Silver, and Black paints, and gave it a little paint job. To simulate water, I used "Triple Thick" varnish, so called because...it is triple thick varnish. Sometimes product names just aren't all that inventive.
Triple Thick Varnish By DecoArt
If you do a lot of small work, this is a great product to have, as you can simulate water, give depth to a window pane, etc. It could be used in lieu of a more vaporous concoction for drink contents, etc., for that matter as well.
Fitting the Train Set to The Layout
It is always good to "get the lay of the land". This is post-track application, and technically "finished". I wanted to make sure that I had enough room for the buildings and for the trains to be sitting on the tracks, and also how things would fit together before I was rash enough to glue anything down. As it turns out, there was going to be a need for a short passenger train coming into this town, anengine and one car. Somehow, I didn't see that train getting around some of those corners easily without derailing itself if it was any longer than I made them.
Landscaping!
When I finished getting the track down, and my town in place, I looked at it thought ... well, that is boring. I realized that a) the track was a "closed" track and b) everything looked a little "flat" in colour.
To deal with the first problem - what do I mean by "closed" track? Simply put, before track modification my train (if it was real system) would simply follow two loops around the town, but never be able to go anywhere. Fine for a child's toy, I suppose, but an adult enthusiast just wouldn't have this happen. It does not make sense that layout with such a small downtown shopping area would have two big engines and 3 passenger cars serving it, along with a fairly good sized depot. The train would never leave the area, doomed to circle around the town only a couple of blocks long. I mean, who do they think will be riding this train in a town that would take 10 minutes to walk across? Just getting to the depot, you are liable to walk past your destination anyway, and guess where you would end up getting off the train? Yup, at the *depot*. It just wouldn't happen, and if it did, someone in the city planning department would be getting fired, unless they were lucky enough to be the mayor's nephew, and even then it might be touch and go. So, I put some extra track down so it leads off out of town (I included 2 traffic paths on one side of town, and two on the other). That way, the eye can resolve the fact that this isn't really bad city planning, and gives the whole thing a feeling of movement, which is the heart stone in the model train genre.
For the second problem, I decided to landscape my layout and give it some colour, some interest, some "pop", if you will, so a flat paper project that looks like a flat paper project turns into a diorama that tells a story.
Rail Bed
I applied some tiny Woodland Scenics ballast that I had kicking around. It was very tiny fine grade, and from the smell of it, it is clay based (as it smelled like cheap kitty litter, before fluffy gets to it). This brand of course isn't necessary, although it is common enough in hobby stores that sell model trains. I have also found land scaping "kits" in certain box stores that shall remain named after one or two members of the Monkees. I probably could have gone as fine as sand if I wanted, but this gave a nice texture, and i wanted the sand for the river bank proper. I applied glue to small areas, took pinches of my ballast between thumb and forefinger, and sprinkled it over the glue. I tapped the ballast down into the glue, shook off the rest (if you have to vacuum, probably best to do that evil chore *after* you play with landscaping supplies), and groomed the edges a bit with the toothpick. You don't want to do too much glue, nor too long of an area, as to avoid globs of ballast and glue not holding the rocks.
A word on toothpicks. If you can find plastic ones, it can make the gluing easier because a) plastic doesn't swell with moisture like the wooden toothpicks do and b) you can wipe off the glue boogie (that sounds like a dance, doesn't it? Everyone do the Glue Boogie!) that inevitably forms and causes too much glue to be applied.
Track with Ballast
Already the track is gaining character. I have also added sand to the river banks in this shot.
Landscaping complete!
The "grass" went on a bit faster, as I could "paint" larger areas with glue and sprinkle on the "grass" quite quickly. The "grass" is actually very finely chopped flocking. This is NOT a product which you want to breathe in, as there is something called "Flock Worker's Lung", and can be serious. Take care that you aren't getting this stuff airborne, and use in controlled settings. If you use this a lot, you might actually invest in a mask. Isn't it amazing how dangerous a miniaturist's life can be?
Town Glued Down
Here it is! With the greenery and ballast, it does pop quite a bit, as I hoped. All done, the end.
WAIT. You say, where is the little red caboose? There has gotta be a little red caboose, otherwise what is life for? Wondered that myself, actually. From what I can see, this 1950 era passenger train either didn't have one, or not a red one, at least (the bright colour, by the way, had a function, it was to make sure the train was visible from other approaching trains). A caboose may appear on a side track eventually here, but I may have to figure out how to make one as one wasn't included in the kit. All the printies I can find at the moment usually include happy smiling little children's trains and it just won't do (although admittedly, when I was a kid, I hated anthropomorphizing non-living things anyway, even then I wanted realism, so a train with a face is just plain wrong - sorry Thomas). Cabooses were originally places for the conductor to do his paperwork, and this was its doom - once computers came into play for controls and the conductor wasn't as responsible for the paperwork that comes with running a railroad, the caboose faded from existence, as its importance faded. They were technically phased out sometime in the 1980's, although I am sure I have seen cabooses once or twice since then. Until I can figure this out...and I *will* figure this out... here is a little red caboose moment so we know the train has finished passing.